Wednesday, March 27, 2013

Household Chore Tips from Satori Design for Living

Check out a GREAT post from Shauna at Satori Design for Living.  Find out some easy ideas to make household chores go a little smoother and it includes a tip from me!  Click here...


As Always,
Sandra


Sunday, March 24, 2013

Free Printable Babysitter Notes

Here is a new FREE Printable for you!…

Babysitter Notes - SimpleisPretty.com

Use the ‘Babysitter Notes’ printable to write down important information for your babysitter.  Keeps all information that your babysitter will need to need to know in one easy access place. 

Includes sections for:
  • Child Info
  • Parent Info
  • Eating
  • Sleeping
  • Rules
  • Other Info
  • Emergency Info

Click below to download and print the FREE Printable:

Babysitter Notes

Check out more FREE Printables here!

As Always,
Sandra

Wednesday, March 20, 2013

Free Printable Kid’s Toy Box Labels

A few weeks ago, I organized the kids’ toys and art supplies.  I purchased the containers from Canadian Tire.

Storage container

Storage container small

The containers in the picture above are actually supposed to be for storing shoes, but they work perfectly for the kids’ art supplies.  I removed all the stickers on the containers.  If the stickers are stubborn to remove, check out my post on removing stickers for a quick trick!

Kid's Toy and Art Supply Labels

I made some cute labels for the boys’ toy boxes and containers.  But really these cute labels could be used on many different containers, not just children's toy storage.  They are so cute, I've thought of using them to organize my kitchen pantry!

Kid's labels on containers

Check out Poofy Cheeks for my post on how to print and attach the labels to the containers.  Click here for the easy instructions.

Blue Blank Label Printable

Click below to download and print the FREE Printable:

Blue - Blank Labels

As Always,
Sandra

Monday, March 18, 2013

Upstairs Bathroom Remodel

This bathroom is the most used bathroom in our home.  Most guests use and see this room.  Since we completed the downstairs bathroom remodel, we now had a fully functioning bathroom to use while we started work on the upstairs bathroom.  The upstairs bathroom desperately needed a makeover!

Check out the before…

Bathroom Before
Before

I love looking at Pinterest for inspiration. Right now I’m really drawn to white and grey colors. I just can’t get enough of them!  I wanted the room to feel as large as possible so we decided on Gray owl (OC-52) from Benjamin Moore.
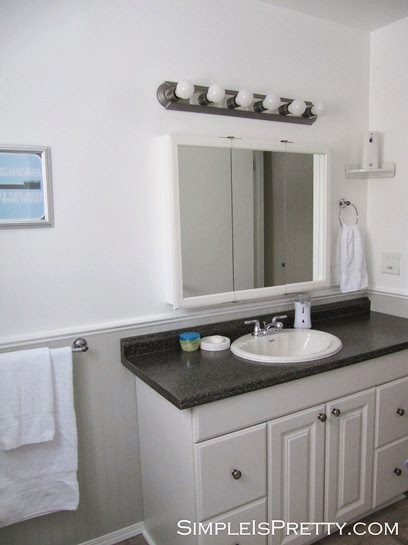


Here is the after…

Bathroom After
After

I have 2 small boys who use this room lots. I find less is more. I try not to keep much on the counter. Less to keep clean. As for the medicine cabinet, I gave it a little face lift a little while ago here.

Bathroom Counter Before #2
Before

Bathroom Counter After #2
After

We reused the old toilet, sink, tub and tiles. The toilet was already replaced a few years ago.

Bathroom Toilet Before
Before

Bathroom Toilet After
After

My husband installed a new counter top to replace the old scratched, scarred, green counter top. Such a huge difference.

Sink Before
Before

Bathroom Counter After
After

The faucets needed an update so they were replaced.  We were able to also reuse most of the hardware and towel racks.  I spray painted the brass on the towel bars and toilet paper holder to give it a quick update.  The light fixture got a quick spray as well.

Fixture Paint

Fixture Before brass finish
Before

Fixture After
After

The old linoleum had holes in it and was way passed its prime. We installed new vinyl waterproof flooring right over top of the old lino.

Bath Tub Before
Before

The bathtub needed some attention.  The previous owners must have had tub stickers at one time because outlines of little butterflies were on the left bottom of the tub.  The tub was almond and the tiles on the walls are white.  This difference in color drew even more attention to the almond butterfly tub.  Not the look I was going for.

Shower and Tub After
After

To save some money, we painted our tub with special white bath tub epoxy and regrouted the bath tiles.

Shower Curtain After
After

I also used a bright and modern shower curtain to lighten things up.

Bathroom BeforeBathroom After

Our bathroom is so much brighter and cleaner.  Such an improvement!


UPDATE...


As Always,
Sandra

Simple is Pretty Parties Here…

I'm closing comments for this post due to numerous spam comments.  If you would like to comment or ask a question, please contact me at sandrapaul@live.ca.  Thanks!

Tuesday, March 12, 2013

Free Labels for Organizing

Check out my post over at Poofy Cheeks for some FREE Printable Labels for organizing.

simpleispretty.com: FREE Printable Labels

Thursday, March 7, 2013

Keep Picture Frames Straight


simpleispretty.com: Keep Picture Frames Straight

One thing that drives me crazy is a crooked picture on my wall.  To be honest, I don’t notice crooked pictures when I’m at someone else’s home.  But it is one of those weird things that I always notice in my own home.  If I’m sitting and watching TV on the couch and I notice a leaning picture out of the corner of my eye, I find myself walking over to fix it.

I’m not sure about you, but depending on the picture frame, straightening the frame can be a frequent occurrence.  Some picture frames have a hard time staying straight, and after a week they can be found crooked on the wall again. 

I have a secret weapon to keep my picture frames on my walls straight. 

simpleispretty.com: Poster holder

Kind of weird I know.  Here is my secret…

simpleispretty.com: Poster Putty

All you need to do is place a tiny amount of Poster Putty (or Sticky Tac) on the back bottom corners of the picture frame and press the frame against the wall.  This will usually keep your pictures from having to be readjusted.  If the frame is larger, you may need to place the putty in all four corners of the picture frame.

simpleispretty.com: Poster Putty ball

Sticky tac on picture frame
This works well, especially for wall arrangements.  I used it on the pictures in my dining room.

simpleispretty.com: Dining Room Pics

Poster Putty also prevents the marks from pictures rubbing on the wall.  If the frame rubs on the wall, little marks can appear in the bottom corners where the frame hits the wall.  Not good, if you like to rearrange your frames once in a while.  Depending on the mark, a little elbow grease and a wet cloth can remove the mark.  If not, repainting may be the only way to remove the marks.

simpleispretty.com: Mark on Wall from Picture

Try using my Poster Putty trick and prevent those awful marks before they appear!  What are your tips for picture hanging and arranging?

As Always,
Sandra

I'm closing comments for this post due to numerous spam comments.  If you would like to comment or ask a question, please contact me at sandrapaul@live.ca.  Thanks!

Simple is Pretty Parties Here…